服务概览
Service称之为 服务,是Android 四大组件之一。是一种可在后台长时间运行操作而不提供界面的应用组件。服务可由其他应用组件启动,而且即使用户切换到其他应用,服务仍可在后台继续运行。此外,组件可通过绑定到服务进行交互,甚至是执行进程间通信(IPC)。例如,服务可在后台处理网络事物、播放音乐,执行文件I/O或与内容提供程序进行交互。
注意:服务在其托管进程的
主线程中运行,它既不创建自己的线程,也不在单独的进程中运行(除非另行指定)。如果服务将执行任何 CPU 密集型工作或阻止性操作(例如 MP3 播放或联网),则应通过在服务内创建新线程来完成这项工作。通过使用单独的线程,您可以降低发生“应用无响应”(ANR) 错误的风险,而应用的主线程仍可继续专注于运行用户与 Activity 之间的交互。
服务类型
以下是三种服务类型:
前台服务
前台服务执行一些用户能注意到的操作。例如,音频应用会使用前台服务来播放音频曲目。前台服务必须显示 通知。即使用户停止与应用的交互,前台服务仍会继续运行。
请求权限
Android 9(API 28)或更高版本 必须请求 FOREGROUND_SERVICE权限 即 <uses-permission android:name="android.permission.FOREGROUND_SERVICE"/>
这是强制要求,否则会抛
SecurityException
启动前台服务
使用 startForeground() 启动前台服务。该方法需要两个参数:一个正整数,唯一标识状态栏中的通知和 Notification 对象本身。通知必须具有 PRIORITY_LOW或更高的优先级
启动示例:
val pendingIntent: PendingIntent =
        Intent(this, ExampleActivity::class.java).let { notificationIntent ->
            PendingIntent.getActivity(this, 0, notificationIntent, 0)
        }

val notification: Notification = Notification.Builder(this, CHANNEL_DEFAULT_IMPORTANCE)
        .setContentTitle(getText(R.string.notification_title))
        .setContentText(getText(R.string.notification_message))
        .setSmallIcon(R.drawable.icon)
        .setContentIntent(pendingIntent)
        .setTicker(getText(R.string.ticker_text))
        .build()

// Notification ID cannot be 0.
startForeground(ONGOING_NOTIFICATION_ID, notification)
停止前台服务
使用 stopForeground() ,该方法可以传递一个 boolean 用以指示是否删除状态栏通知。
stopForeground()并不会停止服务,该服务还会继续运行。停止服务请使用stopService()
后台服务
后台服务执行用户不会直接注意到的操作。例如,如果应用使用某个服务来压缩其存储空间,则此服务通常是后台服务。
绑定服务
当我们需要 和服务交互时 即传递数据、发送请求、接受结果,甚至利用进程间的通信(IPC)就需要使用 bindService() 进行服务绑定,此时的服务处于 绑定状态。
多个组件可以同时绑定到该服务,但全部取消绑定后,该服务即会被销毁。
服务的使用
创建 Service 的子类
class MyService : Serivce(){

}
在AndroidMainfest清单中声明
  ...
  <application ... >
      <service android:name=".MyService" android:exported="false"/>
      ...
  </application>
</manifest>
添加 android:exported 属性并将其设置为 false,确保服务仅适用于您的应用。这可以有效阻止其他应用启动您的服务,即便在使用显式 Intent 时也如此
启动服务
根据情况使用 显示Intent,通过 startService() 或 bindService() 启动服务
startService()
// 注意 Kotlin 获取 .class 的写法
val mIntent = Intent(this@SomeActiviy,SomeService::class.java)
//startService()
startService(mIntent)
bindService()
//创建Ibinder接口实现类,这边使用已实现该接口的Binder的子类
class MyBinder : Binder(){
    fun doSomething(){

    }
}
// 在Service中重写onBind()方法,指定返回的IBinder
class MyService : Service() {
    override fun onBind(intent: Intent?): IBinder? {
        return MyBinder()
    }
}

// 提供一个ServiceConnection,这是和Service通信的关键
val mServiceConnection: ServiceConnection = object : ServiceConnection {
    override fun onServiceConnected(name: ComponentName?, service: IBinder?) {
        // 将IBinder转换为MyBinder
        val binder = (service as? MyBinder)
        binder?.doSomething()
    }

    override fun onServiceDisconnected(name: ComponentName?) {

    }

}
// 注意 Kotlin 获取 .class 的写法
val mIntent = Intent(this@SomeActiviy,SomeService::class.java)
//bindService() ,该方法需要的参数:一个显示Intent指明启动的Service,一个ServiceConnection,一个创建参数
bindService(mIntent,mServiceConnection,Service.BIND_AUTO_CREATE)
停止服务
| 启动方式 | 停止方法 |
|---|---|
| startService() | stopServcie()或在Service里调用stopSelf()、stopSelf(int startId) |
| bindService() | 将与Service绑定的所有组件解绑,即使用unBindService()。调用stopServcie()或stopSelf()无法停止服务 |
服务生命周期
左边使用 startService() 右边使用 bindService()启动的服务
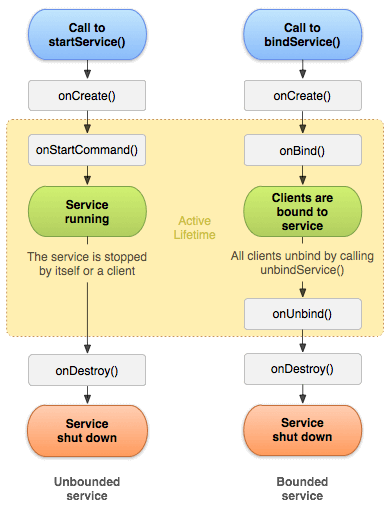
在生命周期内的回调方法
onCreate():首次创建服务时,系统会(在调用 onStartCommand() 或 onBind() 之前)调用此方法来执行一次性设置程序。如果服务已在运行,则不会调用此方法。
onStartCommand(): 通过 startService() 启动时会执行的方法。此时服务启动并在后台无期限运行,所以需要调用 stopSelf() 或 stopService() 来停止服务
onStart(): 在onStartCommand()后执行。已被标记为废弃,不用管了。
onBind(): 通过 bindService() 启动时会执行的方法。此时必须返回一个 IBinder,提供一个接口以供客户端用来与服务进行通信。如果不希望绑定,返回 null 即可。
onDestroy(): :当不再使用服务且准备将其销毁时,系统会调用此方法。服务应通过实现此方法来清理任何资源,如线程、注册的侦听器、接收器等。这是服务接收的最后一个调用。
通过 startService() 启动的 Service 的生命周期
先给个结论
| 启动方式 | 启动一次 | 启动多次 |
|---|---|---|
| startService() | onCreate()->onStartCommand()->onDestroy() | onCreate()->onStartCommand()->onStartCommand()->……->onDestroy() |
代码验证
override fun onStartCommand(intent: Intent?, flags: Int, startId: Int): Int {
    Log.e("TestService", "flags = $flags startId =$startId onStartCommand()")
    return super.onStartCommand(intent, flags, startId)
}
// 使用startService()启动服务
val mIntent = Intent(this@SomeActivity,TestService::class.java)
//启动3次
for(in 0...2){
    startService(mIntent)
}
// 使用 stopService()停止服务,不管调用多少次startService() ,只需要调用一次 stopService() 就可以停止service
stopService(mIntent)
输出结果

通过 bindService() 启动的 Service 的生命周期
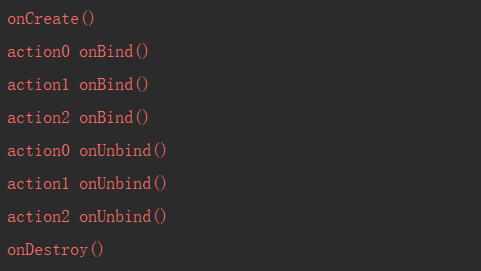
这边会较为复杂,有可能同组件启动一次或多次或不同组件启动一次或多次,此时onBind()方法的调用次数会与Intent有关。相同Intent(action或type不一致即可认为是不同的Intent,即使不同的Intent对象也会被认为是同一个)就不会再触发onBind()方法。原因是:默认使用第一次调用的onbind传回的IBinder,这样的话,会发现服务绑定的内存地址也是同一个。其实就是它一直用的第一个服务绑定的地址。
先给个结论
| 启动方式 | 相同的Intent | 启动一次 | 启动多次 |
|---|---|---|---|
| bindService() | 是 | onCreate()->onBind()->onUnbind()->onDestroy() | onCreate()->onBind()->onUnbind()->onDestroy() |
| bindService() | 否 | onCreate()->onBind()->onUnbind()->onDestroy() | onCreate()->onBind()->onBind()->…onUnbind()->onUnbind()->…->onDestroy() |
代码验证
override fun onBind(intent: Intent): IBinder? {
    val action = intent.action
    Log.e("TestService", "action$action onBind()")
    return MyBinder()
}

override fun onUnbind(intent: Intent): Boolean {
    val action = intent.action
    //发现个很奇怪的现象:换成Log.e("TestService", "onUnbind()"),你会发现onUnbind()会少调用1次,原因未知
    Log.e("TestService", "action$action onUnbind()")
    return super.onUnbind(intent)
}

// 创建ServiceConnection
val mServiceConnection: ServiceConnection = object : ServiceConnection {
    override fun onServiceConnected(name: ComponentName?, service: IBinder?) {
        Log.e("TestService", "onServiceConnected")
    }

    override fun onServiceDisconnected(name: ComponentName?) {
        Log.e("TestService", "onServiceDisconnected")
    }

}
// 通过bindService()启动服务
val mIntent = Intent(this@SomeActivity,TestService::class.java)
// 绑定3次 (使用相同的Intent)
for(i in 0..2){
    bindService(mIntent,mServiceConnection,Service.BIND_AUTO_CREATE)
}

// 绑定3次 (使用不同的Intent)
for(i in 0..2){
    mIntent.setAction("$i")
    bindService(mIntent,mServiceConnection,Service.BIND_AUTO_CREATE)
}
// 解除绑定
unBindService(mServiceConnection)
使用相同的Intent

使用不同的Intent
混合启动取决与启动方式的先后,如果先startService() 则 onStartCommand() -> onBind() ,如果bindService()则 onBind() -> onStartCommand()
startService() -> bindService() 启动的 Service 的生命周期
onCreate()->onStartCommand()->onBind()->onUnbind()->onDestroy()
bindService() -> startService() 启动的 Service 的生命周期
onCreate()->onBind()->onStartCommand()->onUnbind()->onDestroy()
服务的拓展
IntentService
注意:服务在其托管进程的
主线程中运行,它既不创建自己的线程,也不在单独的进程中运行(除非另行指定)。如果服务将执行任何 CPU 密集型工作或阻止性操作(例如 MP3 播放或联网),则应通过在服务内创建新线程来完成这项工作。通过使用单独的线程,您可以降低发生“应用无响应”(ANR) 错误的风险,而应用的主线程仍可继续专注于运行用户与 Activity 之间的交互。
从上可得之Service不合适繁重的任务(当然内部创建工作线程可以解决之),不过Android已经考虑到此种情况,很贴心的给了我们 IntentService 这个类(不过貌似要被废弃了😂)。它是Service的子类 ,其内部使用了 工作线程 用以逐一处理所有启动请求,我们只须关注 onHandleIntent() 就。该方法会创建一个工作线程,我们可以在里面执行耗时操作,操作完成后无需调用 stopSelf() Service即会执行销毁。如果多次调用 startService(),那么 onHandleIntent() 也会调用多次,当 所有的onHandleIntent()执行完毕后Service自行销毁
| 启动方式 | 启动一次 | 启动多次 |
|---|---|---|
| startService() | onCreate()->onStartCommand()->onHandleIntent()->onDestroy() | onCreate()->onStartCommand()->onHandleIntent()->onHandleIntent()->……->onDestroy() |
IntentService中onBind()默认返回null,所以并不合适使用bindService()方法启动
使用方法
class MyIntentService(name: String?) : IntentService(name) {
    override fun onHandleIntent(intent: Intent?) {
        // 我是工作线程,咱不怕耗时
    }
}